Posts

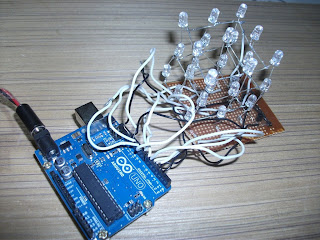
Object Follower Robot

Image
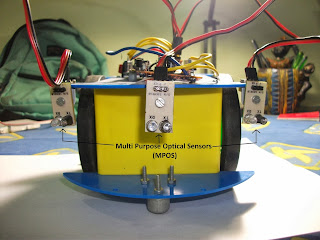
Hi, I'm Saksham from Lucknow, India and here is my newly made 'object follower Robot'.  It all started late in 2011 when I joined the 'BrainCafe Robotics Workshop'. During the workshop we were taught building simple robots including robots like object follower, object avoider, clap controlled etc. However the working of the robot was not explained to us properly. We simply wired up the sensors on the main board using berg connectors and the robot was good to go.   So now, after 3 long years I pulled out that robotics kit once again and modified it to work better. Here are the differences between the modified robot and what the kit included- The simple transistor based 'main board', which the kit included, has been replaced by the Arduino Uno micro controller which behaves according to a program, written using a computer. The kit included 2 optical sensors i.e. left and right. However I have added another sensor in the middle for better r

EMF (Electro Magnetic Field) detector

Image
Hi guys, I'm Saksham Prakash from Lucknow, India. Here is my newly made EMF detector. It will light up an LED whenever it is brought close to electricity. Working (Simple electromagnetism)- Wherever there is a flow of electric current (in an electric appliance), there is an electromagnetic field generated (around the wire Fig. 1) . When the antenna (coiled for better results) is brought close to it, current is induced in the antenna. The Arduino micro controller is programmed to detect this tiny amount of current and if it is above the normal criteria, it lights up the LED.  Program- void setup(){                                                    pinMode(A5,INPUT);                                     pinMode(9,OUTPUT);                                       Serial.begin(9600); } void loop(){                                                                 int a = analogRead(A5);                                       Serial.println(a);            

LM386 Audio Amplifier (Mono)

Image
Hello guys, Im Saksham Prakash, 14, from Lucknow, India. In this post, I'll be showing you the audio amplifier, I made recently. The circuit is built on a perfboard which is fixed inside a cardboard box with the knob and other stuff sticking out. Some details are- IC- LM386 Wattage- 1/2 Watt Input Voltage- 6V-12V (I'm feeding 12V) Type- Mono (still working on stereo) Speakers- 2X 6 ohms 20W Song- She's like the wind - radio remix Here is the super simple schematic of the circuit- Some pics- Front view.. 3.5mm Jack (audio input) Output My two 6 ohms 20W speakers My 9V Battery. Finally the video- TURN YOUR BASS KNOBS TO FULL!!

Simplest Lie detector

Image
Human body has an electrical resistance of about 1 Mega ohm. When our skin is dry, it can be more and when it is wet (from water or sweat etc) it can be lesser. This lie detector detects the resistance of our skin and plays a sound according to it. Lesser the resistance, higher the pitch of the sound played by the speaker. When we tell a lie, we feel nervous and sweat, therefore our resistance decreases which is shown by the increasing pitch of the sound from the speaker. A SCHEMATIC DIAGRAM OF THE CIRCUIT Sorry.. i had no perfboards left :) had to build it on a piece of cardboard. When the person is telling the truth. When the person is telling a lie.

The alternating LED flasher circuit with a 555 IC

Image

my arduino based LED cube 3X3X3

Image
My LED cube - 3X3X3.. arduino based. Hello people.. I'm Saksham Prakash from Lucknow, India. Recently I made a really simple LED cube which can display numbers, alphabets, patterns and designs etc.    The Arduino Micreocontroller The Cube 3X3X3 Random LED Program Program : int i; int a; void setup () {                                                                   for (i=4; i<14; i++){     pinMode(i, OUTPUT); } Serial.begin(9600); } void loop(){   digitalWrite (13, HIGH);   digitalWrite (2, HIGH);   digitalWrite (3, HIGH);     for (i=4;i<=12;i++){     digitalWrite(i,HIGH);     delay(100);   }   for (i=12;i>=4;i--){     digitalWrite(i,LOW);     delay(100);       }   for (i=12;i>=4;i--){     digitalWrite(i,HIGH);     delay(100);   }   for (i=4;i<=12;i++){     digitalWrite(i,LOW);     delay(100);   }     for (i=0;i<3;i++){    

Match-head bomb with electrical ignition

Image
Hello people, I'm Saksham Prakash from Lucknow India. Recently I came up with an interesting but a bit dangerous idea of making bombs. So here I am with two of my best bombs.  They are filled with match heads and a thin wire  running between the match heads and connecting the two wires. When the two wires from the bomb are connected to a powerful battery (I used 12V 7.2Ah) the thin wire burns, igniting the match heads. Since the bomb is sealed from all sides, the bomb bursts making a loud noise. The Electronic BOMB!!! filled with MATCH-HEADS :P Another MATCH-HEAD BOMB! I also made an Electromagnet by coiling a wire around a screwdriver and connecting the ends to my battery. Electromagnet  Electromagnet Lifts a screw. Hope you like it. :)